Previous

Next
| Previous |
| Next |
In particular, they do things over and over quickly, but just a little differently each time.
If Professor Umbridge had let Harry Potter use a computer, instead of the magic pen, to write "I must not tell lies", Harry would have finished in plenty of time for Quidditch practice.
The Tcl/Tk command to tell the computer program to do something a given
number of times is the for command.
The for command is a combination of the set
command, the if command and a do-it-again
command.
The command looks like this:
for {initial conditions} {test} {changer} {commands}
The initial conditions uses the set command
to define how the loop will start. Usually this is setting the value
of a variable to be the value we want to start our loop. It will
look something like this:
set counter 0
The test part is the same as the test used with the
if command. The computer uses this test to figure out
when it's finished the loop. As long as the test is TRUE, the computer
stays in the loop, when the test is FALSE, the computer goes on to the
next line in the program.
A test will look something like this:
$counter < 10
The changer is some Tcl commands to change the value of the
variable we use in the test. It will look something like this:
set counter [expr $counter + 1]
Finally, the commands are what we want to do each time we go through the loop.
For instance, Harry Potter, could have done something like this:
|
This code will start out by setting a variable named counter
to the value 1. Then it tests to see if the value of the variable counter is
less than 1000. The value is less than 1000, because we just set it to 1,
but the computer doesn't know that.
Next the computer will evaluate the commands - in this case that's showing the message box and waiting for the user to click the Ok button.
After running the commands the computer will run the command we put
in the changer part of the for loop. In this case, that
changes the value in counter from 1 to 2.
Finally the computer does the test again, and if it's TRUE, does the body again, then the changer, then the test, until finally the test is FALSE.
Professor Umbridge would need to click the Ok button 1000 times in order to see if Harry had finished his lines. (That would serve her right!)
Lets use a for loop to make a new version of the number game that goes from 1 to 10, and will tell you if you guess too high or too low.
This program puts the buttons in a single column from top to bottom, instead of on a single row from left to right. We'll look at ways to make it look better with grid after we look at this program.
The program will look like this when it's running.
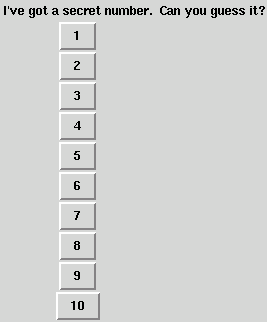
Just below here is the code that makes this program. You should notice a few things in this code.
The commands part of the for loop has an open curly brace at the end of the first line. After that the code is indented until the final closing curly brace at the end.
The first curly brace needs to be at the end of the line, and it needs
a space in front of it, just like the if command does.
The indentation is a common practice that makes programs easier to
read. You don't need to do it, but your life will be simpler if
you do.
The button commands use $counter as part of their
name. This is an easy way to name widgets that you create in a loop.
The .b$counter tells Tcl to get the value from the
variable counter and append that to the .b to make a
variable name. The names of the buttons will be .b0, .b1, .b2,
etc.
The button commands are kind of long. In Tcl/Tk, we
put a command on a single line if we can, but if the command is
too long, we can break it up by putting a backwards slash as the
last character on the line. That tells Tcl/Tk that this command
continues on the next line until there is a line that doesn't end
with a backward slash.
|
This game may not be as exciting as Worlds of Warcraft, but it's a real game now.
Take a break and try putting this into Komodo Edit and play with it a little. You might try making it just run to 5 or up to 15. You can even try making it use 50 or 100 if you like, just to see what will happen.
We can make it look better with some new arguments to the grid
command. Something like this is easier to read:

You can do a lot with the grid command to make a program
look better. We've used the grid command in a pretty
simple way so far. Now, it's time to do something more complex.
The grid command thinks of the GUI like a big checker
board with rows and columns where it can put a widget. The rows are
lines. The first line (0) is at the top and they count down as you
use grid to place widgets in higher numbered rows.
The columns go across. They start with 0 being the leftmost column,
and the column number gets larger as you move to the right. You can
tell the grid command what position to put a widget in
just like you'd put a checker on a square in a checkerboard by saying
"two rows down and 3 columns over".
The grid command supports argument pairs the same way that
the button and label commands do. These
arguments tell the grid command more details about what we
want to do.
The -row argument lets you tell grid what row
to put a widget on, and the -column argument tells
grid which column to use.
You can also tell the grid command that you want a widget to stretch
across several rows or columns. Kind of like if you laid a pencil
across 4 squares on a checkerboard. You do this with the
-columnspan or -rowspan options.
We use 3 of the options to the grid
command in the next game.
-row number
|
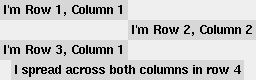
Here's some sample code and the widget layout it creates:
| 
|
Here's the description of how the grid command works:
|
Here's the program that uses these fancier grid commands to make this good looking game.
|
Notice that we've only got one label now, instead of two, and that we
use the -columnspan argument to grid to make
it spread across all the numbers.
Try typing this program into Komodo Edit to see how it works. Try changing the number of secret numbers to 15. You'll need to change 3 places in the code to make this work and look nice.
We can make this code a little bit simpler by changing the code in the
action part of the if command. The example above repeats the
button command 3 times (too high, too low, and you win).
The only difference between these commands is the message.
Why not just change the message, and have a single button command
instead? We can assign the message we want to display to a variable
inside the if command action, and then build a button
with the chosen message.
That version of the program looks like this. It's just a little simpler.
There's a tricky part in this that I'll describe after you look at the program. In particular, look at the button command.
|
You may be wondering why I put the backslash (\) in front
of the quotes for the message.
Here's the reasons:
$message
all go together. They need to be grouped with quotes.
tk_messageBox command.
This is the same trick as when we put a backslash before the end of a line to tell the Tcl/Tk interpreter that this end-of-line isn't the end of a command: we just have a longer command than we can fit on a single line.
expr command to calculate a row based on the
$counter number. You'll need to use the %
operator in expr to calculate the column.
for command will run code over and over
if command.
\) character.
\) character in front of it.
grid command where to place
a widget with the -row and -column options.
tk_messageBox commands.
Have fun.
| Previous |
| Next |